Essure Micro-insert
Device Removal
From 2009 to 2014, we performed over 150 surgeries for Essure micro-insert device removal. Most of these patients traveled to our center for Essure reversal because they wanted to become naturally pregnant and avoid in-vitro fertilization. Others came for Essure coil removal because they were having Essure related side effects and strongly desired to avoid having a hysterectomy.
Approximately 30% of our Essure surgeries are for Essure coil removal alone. As a result we have developed significant expertise with Essure coil removal.
 We are aware many doctors are removing Essure coils without having any prior experience or knowledge on proper micro-insert removal. Many doctors may be approaching this similarly to a retained or perforated IUD. The Essure micro-inserts cannot be approached as one would approach a difficult IUD removal because Essure devices are more fragile and prone to fracturing at the time of removal. We have had patients contact us because Essure coil fragments have been fractured and left behind after an attempt at coil removal, salpingectomy, and even after hysterectomy.
As a result of our experience and the lack of published literature currently available regarding Essure coil removal, I thought it was prudent to share our insight for the benefit of other physicians who may be considering Essure coil removal for their patients. After performing a literature search on Essure complications and finding the best paper on Essure coil removal had a total of six (6) patients, I thought our experience with over 150 patients may allow me to provide additional information that may be helpful to other physicians and their patients.
Essure removal recommendations
It is important to be aware of the manufacture recommendations regarding micro-insert device removal. The following is an excerpt from the Essure package insert:
Micro-insert Device Removal
Micro-insert removal should only be attempted if a patient is experiencing an adverse event(s) with the microinsertor if she demands micro-insert removal.
A cornual resection of the proximal fallopian tube may be required to remove the Essure micro-insert in some cases.
An Essure micro-insert can be removed with traditional linear salpingotomy or salpingectomy accomplished via laparoscopy or laparotomy.
- To perform a linear salpingotomy, a small incision (approximately 2 cm in length) is made along the antimesenteric border of the fallopian tube, directly overlying the micro-insert.
- Total or partial salpingectomy can be performed to retrieve the micro-insert along with, or independent of, the performance of a traditional tubal sterilization procedure. Should micro-insert removal be deemed necessary, a transabdominal approach (i.e., laparotomy or laparoscopy) is required.1
Most physicians have very little experience with cornual resection, which can be difficult and result in a large blood loss if one is not experienced. A linear salpingotomy is a reasonable approach except the coils fracture and disintegrate if exposed to electrosurgery or excessive traction. After salpingotomy, traction must be applied to the coils and this increases the chance of coil fracture anywhere along the length of the external coil or at the point of weld between the outer coil and the radiolucent platinum marker.
Salpingectomy is reasonable; however, many surgeons may be dissecting across the coil when removing the tube from the uterus and leaving the intramural portion of the coil inside the muscle of the uterus.
Unfortunately many women with Essure complications are having hysterectomies because physicians are uncomfortable with the above procedures. Unfortunately some women are having hysterectomies (vaginal or abdominal or laparoscopic) and are having residual coil fragments left behind.
Removing Essure coils
Personal insight
Cornual resection should only be attempted by persons with experience in this procedure.
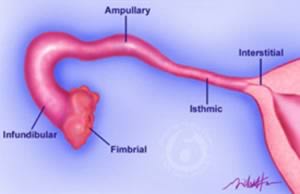 Surgeons must be aware there are many natural anatomic variations in the direction, orientation, and depth of the isthmic section of the interstitial portion of the isthmic section of the fallopian tube as it travels through the myometrium.
A failure to appreciate the many anatomic variations may result in the surgeon dissecting across the micro-insert device and leaving fragments of the device behind. For more information about variations in interstitial fallopian tube anatomy: Essure fragments: Avoiding Essure Complications
During cornual resection great care must be taken to have adequate hemostasis because of the extremely vascular nature of the myometrium. If hemostasis is not adequate the temptation is often to be excessive with both electrodissection and electrocoagulation and this can contribute to micro-insert fragility and fracture.
Hysterectomy
We have received reports of fragments of coils being left behind after either vaginal or abdominal hysterectomies. This occurs because surgeons are not appreciating the distal portion of the micro-insert projects into the fallopian tube and beyond the uterine myometrium.
 In a normally inserted micro-insert device the coil will project 1 to 2 cm into the tube and beyond the myometrium. Surgeons must also be aware the distal portion of the Essure device tapers and extends beyond the more visible and more palpable outer coil.
Very often the distal portion of the device is not visible through the tubal muscularis. A failure to appreciate that the most distal portion of the device is not easily visible may be causing some surgeons to dissect across the devices.
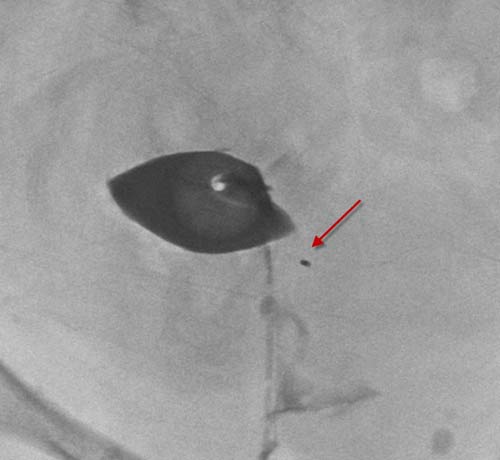
If the micro-insert device has been inserted too far then the coil may project even further than 1 to 2 cm into the tube. We have observed coils that have projected as far as 3 to 4 cm into the isthmic section of the fallopian tube and coils that have protected as little as 10 mm into the isthmic section of the fallopian tube. If variable amounts of coil projection into the fallopian tube is not appreciated by surgeons then transection across these coils during hysterectomy will occur.
Transection across the micro-inserts may be more likely during vaginal hysterectomy. During vaginal hysterectomy it is standard operative technique to dissect immediately adjacent the lateral edge of the uterus. This plane of surgical dissection often goes immediately across the fallopian tube insertion site. Surgeons who are performing vaginal hysterectomies for Essure related complications should be aware of coil projection into the fallopian tubes. Surgeons who are performing vaginal hysterectomy for Essure related complications should be prepared to remove the fallopian tubes to minimize the risk of leaving portions of the coil within their patients. If the coils have perforated or migrated away from the myometrium then a vaginal hysterectomy is a suboptimal route for obtaining ectopic Essure micro-inserts and plain film x-rays can be misleading regarding the location of these ectopic Essure coils.
For more information: Removing Essure: Understanding the Device
Minimally invasive techniques for removal
Laparoscopic and robotic
I have extensive clinical experience with laparoscopic surgery. I have no clinical experience with robotic surgery. I am very aware these techniques don’t always allow for superior hemostasis and rely more heavily on either chemical agents for vasoconstriction or extensive use of electrosurgery. Although there may be good techniques for laparoscopic/robotic coil removal the increased reliance on electrosurgery may be more likely to result in increased risk of coil fracture when the surgeon is attempting coil removal alone.
Avoid using electrosurgery
To better understand why we recommend not using electrosurgery either directly on or adjacent to the Essure micro-insert devices it is best to understand the composition of the two coils and, in particular, the outer Essure coil. Our recommendation to avoid electrodissection is not because of metallic dispersion of electrical energy, but rather the energy from electrosurgery causes the thin outer nitinol band to burn and become more fragile and prone to fracture.
For more detailed information: Essure Micro-insert Coil Device: A Detailed Explanation
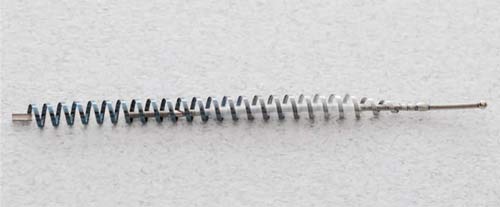
The outer coil is nitinol, which is a 50:50 mixture of nickel and stainless steel. This alloy was chosen because it has heat-transforming properties that more easily allow it to change shape after insertion. Presumptively this alloy also burns at a lower temperature than other metals or alloys typically used in the human body.
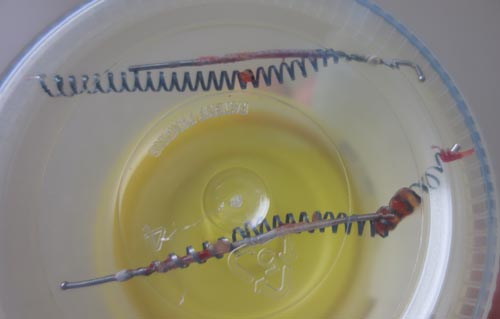
We have observed the outer coil of the micro-insert easily burns and disintegrates when directly exposed to electrosurgery (either monopolar cutting or monopolar coagulating current). The remaining outer coil then becomes more brittle and fractures more easily when traction is placed upon it. Another provider has also made this observation regarding electrosurgery use during micro-insert removal.2
We now avoid using electrodissection during the removal of the Essure micro-insert devices. It appears safe to perform electrosurgery near the micro-inserts for hemostasis but not directly on the micro-insert devices themselves.
Avoiding excessive traction
We have discovered the Essure micro-insert devices will break easily when excessive traction is applied. When we have applied constant traction on the micro-insert devices and observed the coils unwinding during removal we would often experience fracturing of the coils as the length of the unwound coil increased.
Very often the most proximal segment of coil could be retrieved and traction could be resumed. Occasionally the most proximal piece would retract into the deeper portion of the myometrium and this would make finding the severed coil and continuing the manual extraction more difficult.
Essentially you cannot just pull on the device without stopping or you risk severing the coil.
We soon discovered a ‘hand-over-hand’ extraction technique provided better control of the extraction process and seemed to minimize the risk of coil breakage while tension was being applied to the coils. As the coil unwound with extraction, we would then grab the coil section nearest the uterus and continue with traction. This seemed to minimize the risk of coil breakage when compared to constant traction on a longer length of coil.
We found hemostats provided the best source of traction without physically damaging the Essure micro-inserts. Hand held forceps don’t grab well enough and larger devices (i.e. Kelly clamps) are more damaging to the coils.
Timing of Essure coil removal
The inner Polyethylene Terephthalate (PET) fibers cause the ingrowth of fibroblastic tissue and this is the mechanism that causes gradual tubal occlusion. By the third month after Essure insertion approximately 98% of patients will have complete tubal occlusion. This is a gradual process and it stands to reason the coils should be easier to remove before fibroblastic scar tissue anchors them into the tubal muscularis.
 We have discovered the micro-insert devices are more easily removed if removal is attempted within the first three months of initial Essure insertion. The devices can often be easily removed intact and the risk of fragmentation seems much lower. In some patients the coils can be easily extracted after 3 months but with progressive scar tissue formation the coils become more locked in.
When the coils have recently (less than 3 months) been inserted it has been our observation that a simple incision on the antimesenteric side of the fallopian tube and direct extraction would often work without increasing the risk of device fracture. The devices can often be removed intact and in their natural coil like state within the first three months.
The main risk of traction on the devices is fracture of micro-insert either in the middle segment of the device or more commonly near the welded proximal platinum band.
For more information: Removing Essure Devices: When to Apply Traction
Proximal tip fracture
The outer nitinol coil is welded to a small rectangular platinum band. This proximal platinum band provides a radiolucent marker to more easily distinguish proper micro-insert device placement during x-ray imaging.
 This welded connection seems to be a source of weakness in the outer coil. Even with careful attempts at extraction this platinum band can often separate from the outer coil and become embedded deeply in the myometrium. This seems to occur more often when we were applying traction after PET induced scar tissue has formed. This rectangular band would often ‘snag’ on the scarred tubal interstitial tissue and fracture from the outer band.
After experiencing proximal tip fracture in several of our removal patients we are now convinced that an en bloc dissection decreases the risk of fracturing the Essure device and increase the chance of more intact Essure device removal.
For more information on avoid proximal tip fracture:
Essure Removal Advice: Avoid Excessive Traction
Essure coil removal
Our techniques
We perform Essure coil removal as an outpatient procedure utilizing a small laparotomy incision. We keep our incision as small as possible, avoid the use of electrodissection, and carefully dissect the device along with surrounding tubal muscularis. We have experienced excellent results with this approach and have greatly diminished the risk of coil fracture.
Adequate hemostasis
Most important step to removal
We rely on a uterine tourniquet as our method of hemostasis.
We have found a uterine tourniquet to be more reliable than chemical or electrosurgical methods of hemostasis. Since the uterus is extremely vascular, it is important to have proper hemostasis so the surgical dissection can be performed in a controlled and unhurried manner. All surgeons are aware anxiety and stress increase when hemostasis is not adequate.
We do not utilize chemical vasoconstrictive agents because these agents often seem to have limited effects on normal myometrium and their efficacy seems unpredictable. Moreover when bleeding occurs it is common to use larger dosages of these agents. These hemostatic agents (i.e. vasopressin) when used in amounts larger than 20 units have unfavorable effects on blood pressure and are not always conducive to early ambulation required for outpatient ambulatory surgery.
 It is important to emphasize using a tourniquet does not make it a bloodless surgery. There will be residual venous blood with a dark deoxygenated appearance in the uterine myometrium during the dissection and adequate suction aspiration will need to be performed by an assistant. If there is active bleeding during the dissection then the tourniquet was not well placed.
We initially used a 14 French latex Foley catheter with good results. We then decided it was important to make our facility latex free and we had to forgo the use of Foley catheters as tourniquets. We then began using 1 monofilament suture with excellent results. Absorbable 1 monofilament has a better knot holding ability when compared to the non-absorbable monofilaments and seem to provide superior tension during tourniquet application.
We exclusively use absorbable 1 monofilament for our uterine tourniquets.
For more information on safely removing Essure devices during outpatient surgery:
Essure Removal Surgery: Keeping Surgery Safe and Outpatient
Sharp dissection
Control to minimize coil fracture
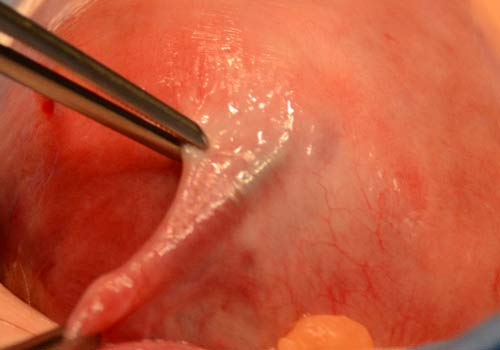
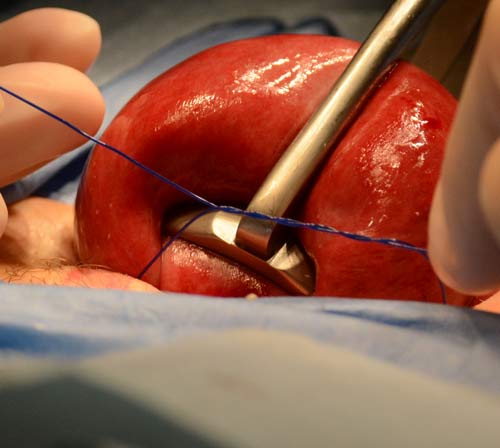
Once an adequate tourniquet has been applied, we then perform sharp dissection directly on top of the visualized Essure micro-insert device using a sharply pointed scalpel (i.e. #11 blade). Sharp dissection begins on the antimesenteric side of the fallopian tube in the area where the coil can be best visualized. Very often the dissection starts it the middle of the device and will continue towards the most proximal portion of the micro-insert.
Tracking the micro-insert device overcomes anatomic variations
We then track the device under direct visualization towards the uterine cavity as we dissect directly on top of the device using a scalpel. This allows us to follow the micro-insert device directly and, as a result, we do not have to worry as much about individual anatomic variations as we would have to if we were performing a cornual resection.
Dissection begins in the middle of the coil and continues towards the intra-cavitary proximal most portion of the coil. An assistant ensures adequate visualization through use of a suction device with a Fraiser type suction tip. This type of suction allows for better visualization with a smaller uterine incision while at the same time providing adequate removal of fluids to improve visualization. During the entire dissection electrosurgery is not utilized and tension is not applied to the micro-inserts. It is helpful to utilize a Debakey or similar type of forceps to stabilize the insert and prevent it from rolling during dissection.
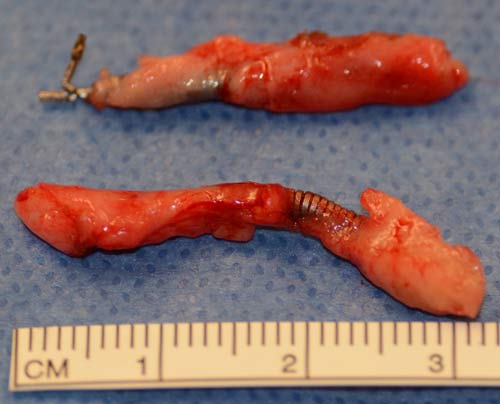
Once the intracavitary portion of the coil has been identified the entire proximal end is lifted from its position at the tubal ostium. The dissection then continues ‘backwards’ towards the distal most portion of the Essure micro-insert. Care is taken to dissect the entire surrounding tubal muscularis during coil dissection. Once the dissection nears the isthmic portion of the fallopian tube where the distal portion of device resides care is taken to minimize dissection or injury to the tubal blood supply.
For more information on en bloc dissection of intra-tubal micro inserts:
Essure Coil Removal: Advice On How To Avoid Leaving Fragments
References
- Essure [package insert]. USA: Conceptus; 2002-2010.
- Albright CM1, Frishman GN, Bhagavath B. Surgical aspects of removal of Essure microinsert. Contraception. 2013 Sep;88(3):334-6.
